This is a great hike. Just ask the big horn sheep whose trails you will follow part of the way up and across the mesa. All the way up the trip is through or over steep walls and slopes. The top of the mesa is close to totally flat with great views (unless it is snowing) in all directions. The trip down is almost entirely a high open slope walk off the gentle side of the Waterpocket Fold. Add two river crossings for flavor.
| TIME: | 7-10 hours. |
| ELEVATION GAIN: | 1300 feet. |
| DIFFICULTY: | Moderately high angle scrambling. Difficult route finding. |
| MAPS: | Fruita |
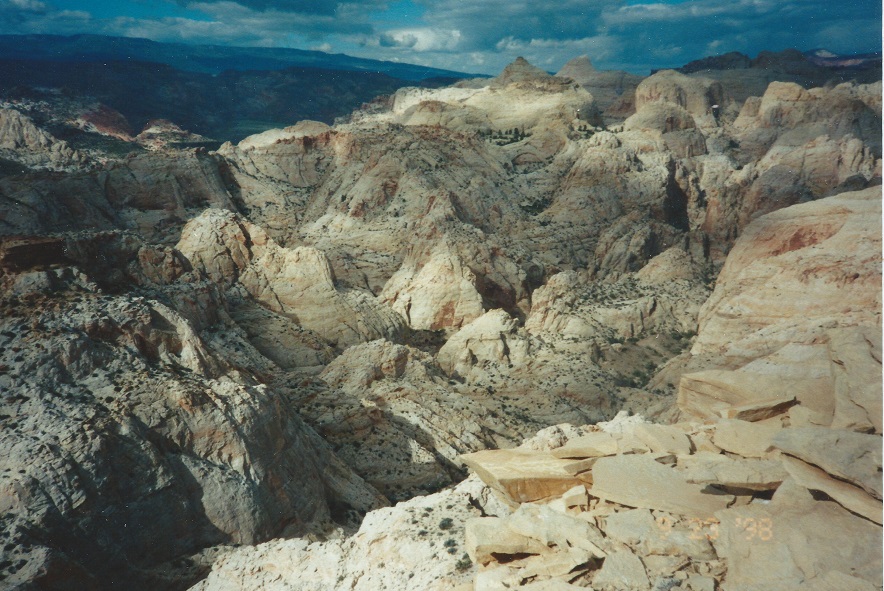
| GEOLOGY: | Interesting views of the Waterpocket Fold. |
| CIRCLE TRIP: | Yes. |
| ACCESS: | From the Visitor Center drive east on Utah Highway 24 for 7.1 miles to mile 86.8. At mile 86.8 on U 24 there is a small gravel place, at the side of the westbound pavement. Park (P) there and walk to the river. The river can be crossed here at all but high runoff levels (Maximum spring flows or flash flood.) The rock layer at the base of the cliffs beside the road is the Navajo Sandstone. |
Once across the river (S) head for the right (east) side of the tributary canyon. The only place to scramble up is an old, mostly disintegrated stock drive ramp. (Look for signs of blasting or wood and pipe barricades at the upper end.) Animals were driven up this sparsely vegetated canyon to get to better feed farther up.
The rock at the base of the ramp is Navajo Sandstone but in the canyon the rock is part of the Carmel Formation.
There is a significant amount of slickrock walking in the wash during the first ten minutes. Fifteen minutes up canyon there is a solid, smooth rock, ten foot high pour-over that can be climbed at the water chute or circumvented to the left.
Twenty minutes up there is a seven foot pour-over of platy but smoothed rock which again can be climbed or skirted to the left.
Twenty five minutes up the wash narrows, and at one point protruding rock reduces the wash to ten feet wide. Immediately beyond the narrow point there are a number of small trees and shrubs. On the right the little tree is a Single Leaf Ash and behind the tree are a number of Apache Plume bushes. On the left there is another shrub that has smallish leaves that are serrated on the end. These are Serviceberry All three plants are common in the wash.
Thirty minutes up there is another rocky section in the wash that could be called a pour-over. It is open, climbs twelve feet and has a right angle turn to the left (west) half way up. Within sight of that, up stream, there is a four foot high ledge that is lowest on the right side. When stepping up that there is a small Singleleaf Ash sort of in the way.
Twenty minutes later the wash narrows some and the rocks change from angular to smoother and rounded in the walls. That is the beginning of the Navajo Sandstone.
After five more minutes, the canyon is narrowing and the wash cascades through a yellow and brown colored zone of Navajo sandstone for a total of eight vertical feet. At the end of the yellow and brown color there is a significant junction where a side drainage comes in from the left (south) at a 90 degree angle. It only appears to be a side drainage. It is, in fact, the main drainage locked in by the Navajo Sandstone. The route goes left (south) and follows the drainage. (It is easier to go back a little way to get up the side of the canyon.)
Walk up the wash for twenty minutes or so, going right (west) at the questionable junction. Where the wash is blocked by rocks (G), some of which form an inverted "V", go up the left (south) side of the "V", finish the scramble, then after only a few more steps, look to your left (south) at the canyon wall. The slope is somewhat broken and there is a ridge top about 100 vertical feet above.
Climb up that left (south) side of the canyon part way to the ridge, then double back to the left (east) and angle, back downstream above the wash. The goal is to get to the top of the ridge, but the easiest way is to go back a ways. After rounding a bend, a break (B) in the wall will be obvious ahead. The break is in a patch of yellow brown rock. Walk to the break, then up to the top of the ridge. The ridge turns out to have been only a change in slope, but that is no longer of any concern.
To the south (straight ahead as you came up through the break) there is a narrow cut in the sandstone wall. Go to the base of that and climb the 100+ vertical feet to the saddle (S) at the top. From the saddle turn right (north) and climb, skirting to the left (west) of the vertical cliff. As soon as convenient, turn right (east) and go to the top of the bench (U).
The bench is a nice easily walkable break in the steep slope of Horse Mesa. Walk north along the bench with the grey, crossbedded sandstone on the left (west). After rounding a corner, continue until, shortly before having to go down to cross a drainage, you find that the grey sandstone has been covered by dirt and rock. The material forms a nice ramp (R) on which to get above the sandstone and a brownish rock cliff above that.
Turn left (southwest) and go up the ramp to near the base of a nearly vertical white/grey rock band about forty feet thick. This is a gypsum bed in the Carmel Formation and the most dangerous layer in Capitol Reef National Park.
It is not competent rock. It is sharp, usually forms a steep face and can crumble any time.Traverse to the right (west) from the ramp along the base of the gypsum bed to the drainage coming down from the small saddle at the top of the ridge. Climb through the gypsum in the drainage (D). (It is the route the Big Horn Sheep use.) Once through the gypsum, continue (C) up to the saddle then turn and climb a short distance to the top (T) of Horse Mesa.
EXPLORE!
Circle trip:
Should you choose to go back a different way, it can be done as follows:
From where you reached the top of Horse Mesa, walk north.
After about 35 steps there will be some old wood across your path.
Look closely and you will see a line of wood was once piled across the mesa top just north of the saddle.
It was done by early day ranchers who grazed animals on the mesa.
The wood was a drift fence to keep their stock from going to the saddle.
An old camp and can dump show that the early cowboys spent some time on top, as did the Indians before them.
Your assignment, should you choose to accept it, is to figure out how and where the ranchers got their stock to the top of the mesa.
After the "fence" continue north for three quarters of a mile to the second major ridge going east off the mesa. Walk out that ridge, staying fairly close to the right (south) edge. The ridge will eventually narrow significantly to just a flat rocky strip. Cross the strip then stay left (north) and follow a faint game trail to another wide section of ridge. The next time the ridge narrows there is a piece of the top missing.
Just before you go down to the ramp (K) below, notice the long pile of rocks (and a couple pieces of wood) crossing the end of the ridge - another drift fence built by ranchers.
Go down to the ramp that crosses to the next part of the ridge. Cross, and go up the chimney at the far end. The chimney is easier than it looks. Once back on the ridge continue east and down. The view ahead includes the San Rafel Swell and Factory Butte with North Cainville Mesa in front of the Butte and South Cainville Mesa just south of that. The Henry Mountains stretch out to the Southeast.
The ridge narrows again and another hunk has been taken out of the ridge top. Work your way down to the ramp, cross it, then turn slightly left (north) and traverse along the north side of the ridge. About 200 feet from the end of the ramp there is an easy zig-zag route to the top of the ridge. If you miss that, continue side-hilling until the ridge-top cliff dissipates and the ridge top is more easily accessible. Resume the walk down the ridge.
DANGER!!!
Once back on the ridge pay close attention to where you are, where you are going and these directions. The little canyons in this area are very unfriendly. Notice where you are so you can return if necessary. There is a major drainage on your left (north) as you move down to the east. Keep it there. You can stay to the right (south) of any minor drainage that goes left directly into that canyon, but do not allow yourself to be separated from that canyon by a drainage going to the right (south).
Down the ridge a ways, the flat broken rock type surface that has existed since the top of the mesa, will end at a rise in the ridge. Go up the rise to the top (about 40 feet) then continue with the same goal. The ground surface is strange and very lightly vegetated. It is composed of pure massive gypsum. The tallest plants are Apache Plume and the most common shrub is Mormon Tea. The Mormon Tea appears to be just a collection of grey-green sticks in bundles.
After two or three minutes on the moonscape (gypsum), there is another hill to climb (30 Feet). Climb it and stay left (north) for three more minutes to another hill. Climb near the center or just left (north) of center to the top, and here is the exception to staying to the left. This time walk just to the right (south) of the first drainage that heads down to the left. Follow the ridge to the right (south) of that drainage to the base of the next hill.
Climb the fourth hill (about 40 feet again) but this time the surface changes to a light grey with shiny hunks in it. The shiny pieces are also gypsum though a different structure. This is crystalline gypsum called Selenite.
From what looked like the top of the reddish-brown and gray ridge, turn right (southeast) and climb a few more feet to the top of a hill (H). It is time to ignore the canyon on the left (north).
The country is getting pretty broken up, but go on southeast from the hill along a ridge for a ways then bear left, head east and go down to South Desert any way you choose. Once off the slope go east to a wash. (Look up it and you may see a Juniper tree in the wash above you.)
Go down the wash to a junction with a smaller wash coming in from the right (west). At that wash junction or just a few feet below, there is a well used cattle trail crossing the wash. Turn right (south) and follow it for a mile to the major Deep Creek wash. Cross the wash and continue south on a cattle trail. Again, at the major wash cross and take a cattle trail south. The third time the trail gets to Deep Creek wash, just follow the wash to the Fremont River.
The confluence of Deep Creek and the Fremont River is a good river ford. If you left any gear at the other river crossing you can walk up and cross there again, though the trip is not easy.
From near the confluence, go through the brush toward the telephone pole on the west side of the wash. Follow game trails or ridges above the brush most of the way up river. As you near the previous river crossing go down into the brush and back to the gear or vehicle.
 | ||
23June2017
|
Email: | |
